
Do you collect feathers? Then, you must know how to clean a bird feather. If not, that’s fine!
Birding (collecting feathers) is an aesthetically pleasing hobby for many of us. It doesn’t go in vain also. There are plenty of beautiful projects you can do with this hobby.
The most common use of feathers is found in the dream catchers. You can also use feathers in wall art, garlands, juju hats, etc.
No matter where you put the feathers, the first and foremost criterion before using feathers is to clean them. If you don’t have a clear picture of this, we will help you out.
Today, we will explore why you should clean the collected feathers and how to clean a bird feather. Let’s begin.
You Should Know,
- It’s not an easy hobby. In the United States, it is illegal to possess the feathers of any native bird. You can’t collect them, even if you find them on the ground.
However, you can keep molted feathers from domestic or any non-native bird species, without facing any obligations. - Mites and germs often contaminate feathers. Birds are the free creatures of nature. They roam around free in the wild. That’s why, cleaning is mandatory for collected feathers.
- Bird feathers are delicate and fragile. You have to be extremely gentle, otherwise, the barbs and barbules will break, and the entire feather will wasted.
- Ducks and other waterfowl secret oils over their feathers from the preen gland. Collecting their feathers would take special care to preserve the waterproofing properties.
- You can preserve feathers following different methods. However, consider using acid-free materials to prevent deterioration over time. It is also safe for you.
- You can learn a lot from the feathers. They reveal interesting facts about migration, age, gender, health, etc.
So, you get why feathers are more than just collectibles. Different countries follow different rules on birding. In the UK, you literally need a license to collect feathers.
Why Do I Need to Clean A Bird Feather?
Feathers from pet birds won’t require excessive cleaning. However, wild bird feathers carry dirt, dust, allergens pathogens, and other microparasites. If you use them without cleaning at first, it can affect any craft or art projects.
Given the fact that, when a person sensitive to allergens touches the projects, it will not be so welcoming.
Additionally, clean feathers will be easy to preserve for a long time. Dust, debris, or any micro-orgasms often attract pests, that would harm the feathers. The only way to get out of this is, to properly clean the feathers.
Plus, restoring old feathers can’t be done without the first step of cleaning. Some people collect feathers in order to preserve them for a long time as a souvenir.
To do so, you have to dry and lock them after a thorough cleaning process. If micro-orgasm remains inside the sealed box, it will ultimately get moldy! Also, you have to look out for feathers that have tiny holes or loose fluffs. (The Selection Process).
In short, it is important to clean the feathers to maintain healthy hygiene for yourself, others, and the art projects. You simply can’t put a dirty feather on the show and expect others to praise it!
In case, you don’t have a clue where to begin, the next part of our article will guide you. Continue reading.
How To Clean A Bird Feather?
It takes actually a few careful steps. Cleaning the feathers starts with learning more about the feathers.
For any craft/ art projects, or simply if you want to restore old feathers, start from here. Make sure you have the following supplies before getting into the procedure.
1) Bird Feathers: You can clean multiple feathers at a time. It mostly depends on the feather size and type. For a small batch of feathers, you can clean 5-10 feathers at a time.
2) Mild Dish Soap: Make sure to get one that has no added fragrance and is soft.
3) Warm Water: Not too hot! Use a thermometer and always maintain a temperature between 103 – 104 °F. High temperatures can often damage the feathers.
4) Bucket or Bowl: You will need it to soak the feathers.
5) Soft Brush: Get a soft-bristle brush, like a toothbrush, is perfect for cleaning delicate feathers.
6) Paper Towels: To dry the feathers, you will need something soft! A paper towel would do the trick. If you can’t find one, soft towels would also be fine.
7) Mesh or Netting (Optional): To maintain the shape of feathers while you dry them.
Once you have the supplies, follow the steps with us,
Step 1: Examine the Feathers

Do not jump directly into cleaning. Instead, you have to go through a selection process first.
When you collect the feathers from the wild, some of them might be in poor shape. They may have light barbs or be poorly spoiled, not in a condition to use.
That’s why you will need to select them carefully first. If you notice mites or noticeable damage, discard them fast to prevent potential contamination of your other feathers.
Step 2: Soak the Feathers
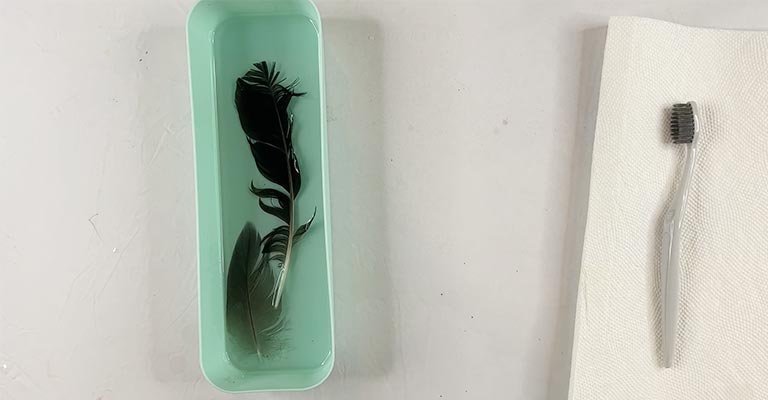
Get the bucket and fill it with warm water. Use a thermometer to maintain temperature. The water should be lukewarm, not too hot.
Add a small amount of mild dish soap. Gently stir the water to create a soapy solution. Put the feathers in soapy water and fully submerge them in the solution.
Let the feathers soak for about 15 to 30 minutes. It will help get rid of dirt, dust, and oils too.
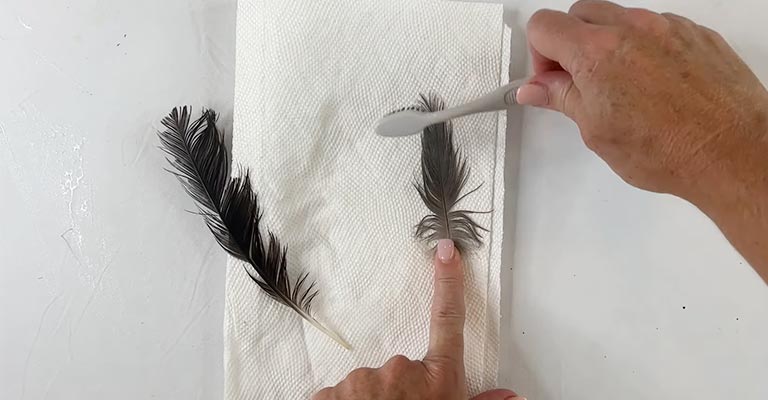
Step 3: Brush the Feathers

Take a soft brush, (a soft toothbrush would do), and gently brush the feathers towards the direction of the barbs. Move the brush from the base of the feathers to the tip.
You have to be extremely careful. Don’t apply hard pressure. Feathers are extremely fragile and would break with irregular pressure. You would perform this step while the feathers are still in the water.
Step 4: Rinse Clearly

Remove the feathers from the soapy solution. In this step, you have to rinse them under lukewarm running water. Gently hover your fingers over the feathers and remove any soap residue.
Don’t directly put the feathers underwater. Instead, use your hand to shield the feathers from the direct flow of water.
Step 5: The Drying Process
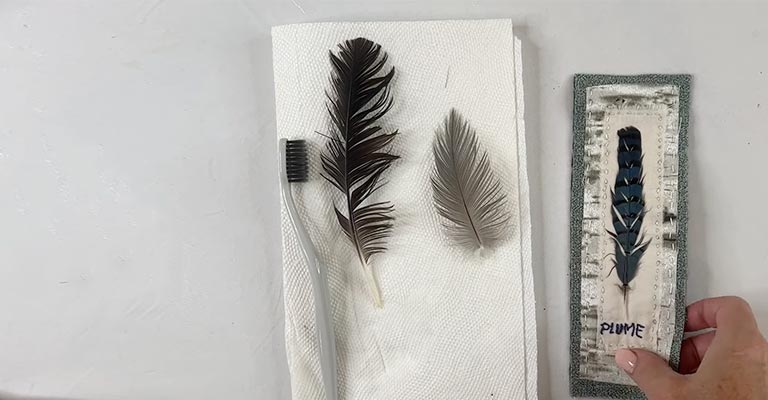
Put the feathers on a clean towel or paper towel. It will absorb any moisture. Gently pat them dry. Be extra careful not to squeeze or wring them, as it can damage the fragile structure.
Let the feathers dry completely. You can use a mesh or net to ensure proper airflow. Keep away from direct sunlight and heat sources. Excessive heat can always damage feathers.
This should do! However, if you think the feathers have stubborn dirt and stain, you can repeat the process as you like. Also, use a mild dish soap, not too acidic or basic.
Last Words
It is mandatory to properly clean the bird feathers before putting them on display. So, get on with the process without making an excuse.
Plus, the process is as smooth as butter and you won’t need expensive materials to clean them! So, now you know how to clean a bird feather.
If you have skipped this stage with feathers you have collected earlier, or already have some raw feathers in your drawer, bring them up and clean it. Trust me you will feel better.
Do you like our article? Let us know in the comment section how our article helped you. Also, share our article with others, it will help us grow too!