
Capturing hummingbirds in their natural element can be a gratifying photographic endeavor.
These tiny, frenetic birds are a sight to behold, buzzing about at lightning speed and flashing their vibrant colors. However, photographing them presents its own set of unique challenges.
I’m here to help you navigate those challenges with practical advice on photographing hummingbirds.
Before we delve into the technical aspects of photography, it’s essential that we first understand our subjects – the hummingbirds themselves.
These creatures are much more than just their rapid wings and radiant plumage. Their behaviors, feeding habits, and preferred environments are critical in successfully capturing stunning hummingbird photos.
Understanding your subject, therefore, goes beyond knowing what they look like; it’s about comprehending their patterns and adapting your approach accordingly.
Now that we’ve established this groundwork let’s dive into the techniques you can use to get those amazing shots.
Choosing the Right Equipment
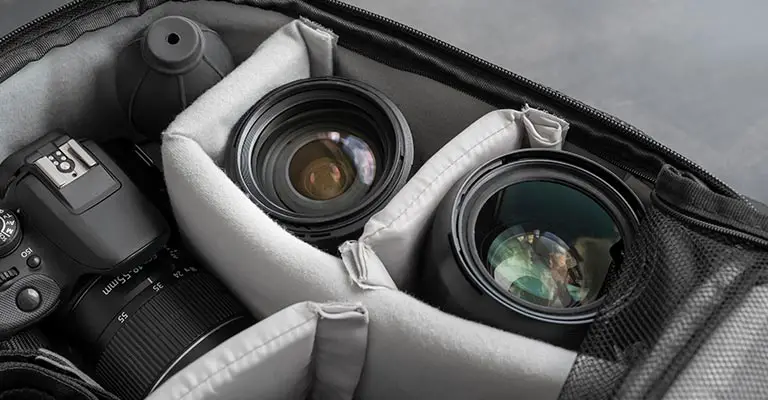
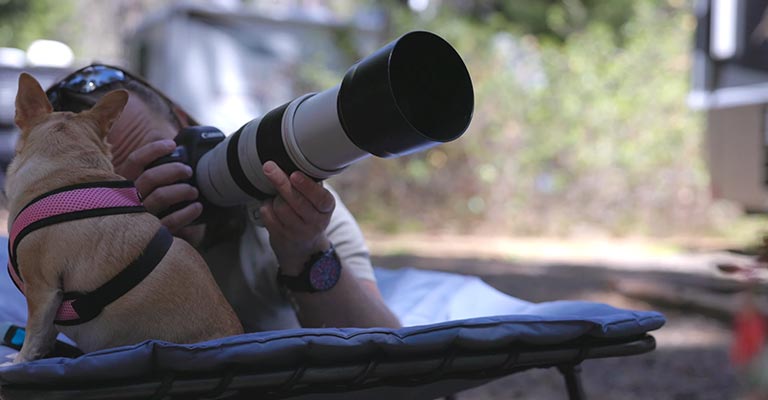
When it comes to capturing stunning snapshots of hummingbirds, the quality of your gear can make a world of difference.
It’s not just about having a high-end camera; there are other crucial pieces of equipment that you’ll need as well.
First off, let’s talk cameras. I’d recommend a DSLR or mirrorless model with fast autofocus capabilities.
Why is that? Well, hummingbirds move at lightning speed and often change direction abruptly. A quick autofocus helps ensure you won’t miss any spectacular shots due to slow response times.
The Importance of Lenses
Your lens selection is equally vital in this venture. A telephoto lens would be my go-to choice for photographing these tiny marvels from afar without disturbing them.
Something in the 70-200mm range should do nicely to capture close-up portraits while maintaining a safe distance.
Flash Units: Your Secret Weapon
Now, here’s something many novice photographers overlook when starting – flash units! Hummingbirds are vibrant creatures with iridescent feathers that shine under proper lighting conditions.
An external flash unit can help bring out those dazzling colors, especially during overcast days or if the birds are in shadowy areas.
Tripods and Shutter Releases – Stability Is Key
Lastly, consider investing in a sturdy tripod, shutter release cable, or remote control device.
These tools will provide stability (essential for crisp images) and allow for hands-free operation so that sudden movements don’t scare away your feathered subjects.
So there we have it – my recommendations on choosing the right photography equipment to capture mesmerizing images of hummingbirds! While this might seem quite an investment initially, remember that good-quality gear will serve you well beyond bird photography alone.
Understanding Hummingbird Behavior
Let’s dive right in. To capture the perfect shot of a hummingbird, it’s essential to understand their behavior.
These tiny birds are known for their speedy flight and iridescent feathers, which can be challenging to photograph if you’re unfamiliar with their habits.
Hummingbirds are creatures of routine. They usually follow a specific feeding schedule, visiting the same flowers or feeders around the same time each day. This predictability can play into your hands when planning your photography sessions.
Feeding Habits and Times
Here are some insights into hummingbird feeding times:
-
Early Morning: An excellent time to photograph hummingbirds is early morning when they’re most active after a long night without food.
-
Late Afternoon: Late afternoon is another prime time as they’re fueling up for the night.
Mating Behavior
Understanding mating behavior is another key aspect when trying to photograph hummingbirds. During courtship, males perform impressive aerial displays that present fantastic photo opportunities.
They’ll ascend high into the sky before diving at breakneck speeds to impress potential mates.
Territory Defense
Another interesting facet of hummingbird behavior is territory defense. Both male and female hummingbirds are fiercely territorial, especially during feeding times.
They’ll often chase away other birds from “their” feeders – leading to exciting action shots if you’re ready!
In conclusion, understanding these behaviors will significantly improve your chances of capturing stunning images of these remarkable birds!
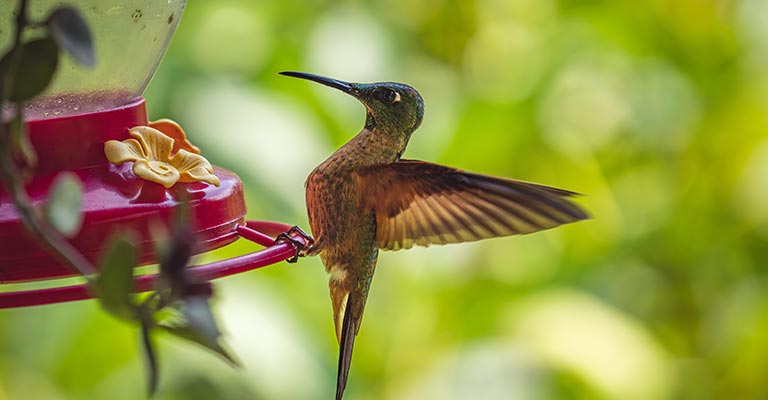
Setting Up a Feeding Station
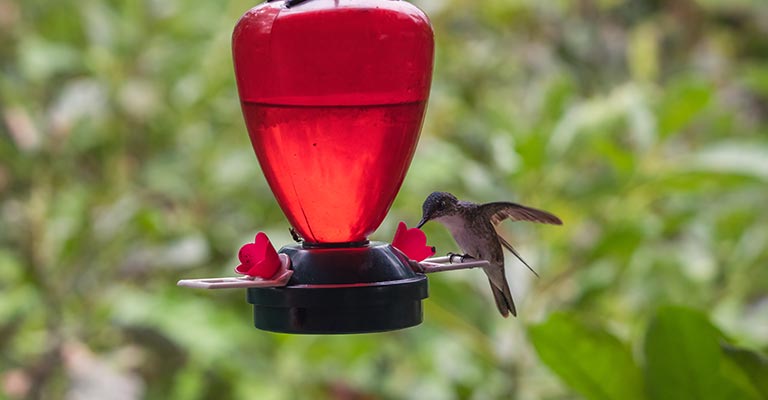
So, you’re ready to start photographing hummingbirds? The first major step I’d suggest is setting up a feeding station.
It’s not just about placing a feeder and waiting; there’s more to it, especially if you want great photographs. Grab your notepad, and let’s dive in.
First off, the location of your feeding station is crucial. Choose an area that’s safe from predators but also gives you clear sightlines for photography.
Close to natural perches like branches or shrubs can be ideal! These spots allow hummingbirds to rest and make for beautiful, natural-looking photos.
Now, let’s talk feeders! There are plenty on the market, but my advice here is: Look for ones with red components – hummingbirds are naturally attracted to this color.
You’ll need to fill these with nectar, which can either be store-bought or homemade (a mixture of four parts water and one part white granulated sugar). Don’t use food coloring or honey, as these can be harmful!
Here are a few other tips:
-
Keep the feeder clean – refill and wash it every 2-3 days.
-
Have multiple feeders if possible – this minimizes competition among the birds.
Another trick in my book is using flowers. Planting nectar-rich flowers near your feeding station works wonders because they provide a natural food source and attract more hummingbirds.
Last but certainly not least, patience is key! It might take some time before hummingbirds discover your feeding station. But once they do, they’ll likely become regular visitors, offering ample opportunities for stunning shots!
Remember, capturing those perfect moments requires practice, persistence, and proper setup – so don’t get discouraged if things aren’t picture-perfect right away!
Finding the Perfect Location
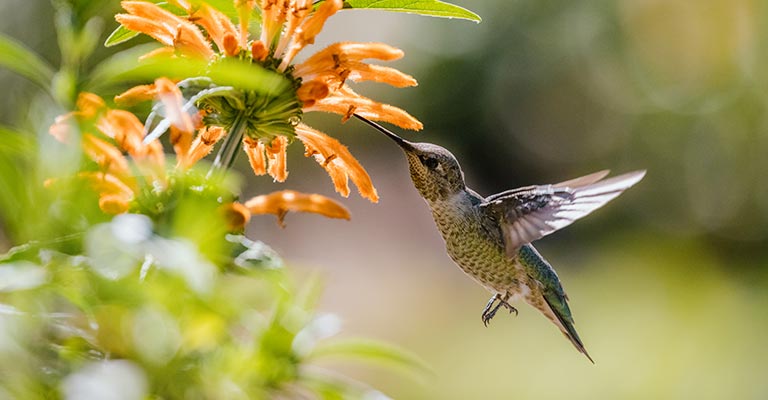
When it comes to photographing hummingbirds, location is everything. It’s not enough to have a great camera and perfect timing. You’ve got to know where these feathered friends love hanging out.
Firstly, understand that hummingbirds are drawn to areas with abundant nectar sources. Gardens or parks brimming with colorful flowers could be your best bet.
Bright blooms like hibiscus, petunias, and honeysuckles are all hummingbird favorites. If you’re lucky enough to have a garden, consider planting these beauties and turning them into a hummingbird paradise.
Establishing a Feeding Station
Another effective method is setting up a feeding station in your backyard. A simple store-bought feeder filled with sugar water can do wonders in attracting these little guys. Remember though:
-
Use four parts water and 1 part white granulated sugar for the mixture.
-
Avoid using red food dye as it could potentially harm the birds.
-
Keep the feeder clean to prevent harmful bacteria build-up.
Hummingbird Hotspots
If you don’t have access to a garden or backyard, don’t fret! There are specific locations known for their heavy hummingbird traffic:
|
Location |
Species Commonly Seen |
|---|---|
|
Arizona’s Ramsey Canyon |
Lucifer Hummingbird |
|
Ecuador’s Yasuni National Park |
Wire-crested Thorntail |
|
British Columbia’s Emerald Lake |
Rufous Hummingbird |
Researching local parks or nature reserves might also lead you closer to capturing that dream shot!
Lastly, remember patience is key in wildlife photography. Even in prime locations, it could take hours to see any action. But when that dazzling display finally starts, it’ll be worth every second of waiting!
Mastering the Techniques for Photographing Hummingbirds
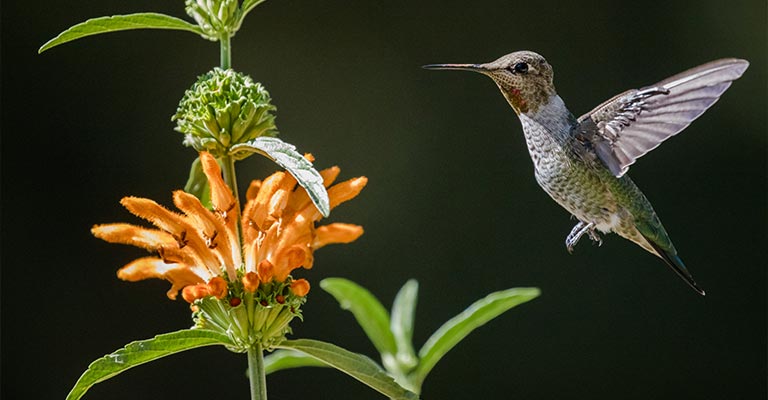
I’ve always been fascinated by hummingbirds. Their rapid wing flapping, vibrant colors, and ability to hover in place are mesmerizing.
But capturing these tiny birds on camera? That’s a whole different ball game. Here, I’ll share some tips and techniques that have helped me master the art of photographing hummingbirds.
First off, understanding your subject is crucial. Hummingbirds are fast-moving creatures with wings that can beat up to 80 times per second!
This means you’ll need a fast shutter speed to freeze their movement clearly in your shots. Aim for at least 1/1000th of a second; anything slower might result in blurry images.
Next comes the challenge of getting close enough without scaring them away. Thankfully, hummingbirds are curious creatures and often get used to human presence if you remain patient.
Try setting up near their favorite flowers or feeders. These spots are like magnets for these nectar-loving birds!
Lighting also plays an essential role when photographing hummingbirds. Remember, they’re adorned with iridescent feathers that change color depending on the angle of light hitting them.
So, experimenting with different lighting conditions can give you many stunning shots.
Finally, don’t forget about composition! Including elements such as flowers or natural surroundings can add context to your photos and make them more compelling.
So there you have it – my top tips for mastering the art of photographing hummingbirds:
-
Use a fast shutter speed
-
Be patient and allow the birds to come closer
-
Experiment with lighting conditions
-
Add contextual elements to your shots
Try these strategies next time you’re out bird-watching – I’m confident they’ll help elevate your hummingbird photography skills!
Tips for Capturing Action Shots
If there’s one thing I’ve learned from photographing hummingbirds, it’s that capturing action shots can be incredibly rewarding.
These tiny birds are perpetually on the move, fluttering their wings at such rapid speed they’re often just a blur in photos. But with patience and know-how, you can get stunning shots capturing their beauty and dynamism.
Firstly, let me stress the importance of shutter speed. It’s key to freezing motion, especially when dealing with subjects as fast as hummingbirds.
A good starting point is 1/1000 sec – anything slower, and you’ll likely have blurry images. If your camera allows it, don’t hesitate to push this value even higher.
Lighting is another crucial factor. Hummingbirds have iridescent feathers, which can exhibit different colors depending on the lighting conditions.
Try shooting early in the morning or late afternoon when the sunlight isn’t too harsh to bring out these dazzling hues in your photos.
Now let’s talk about focusing techniques:
-
Single-point autofocus: This mode lets you select one focus point, ideally placed on the bird’s eye or head.
-
Continuous autofocus: Here, your camera will adjust its focus as long as you half-press the shutter button, making it ideal for moving subjects like hummingbirds.
Remember, though – while these tips might increase your chances of getting a great shot, there’s no substitute for practice and persistence in wildlife photography!
Finally – pay attention to composition! Just because you’re shooting action doesn’t mean you should ignore basic compositional rules like The Rule of Thirds or Leading Lines.
Even when photographing something as unpredictable as a hummingbird in flight, striving for an aesthetically pleasing arrangement within your frame can make all the difference between a good shot and an outstanding one.
Capturing hummingbird action shots can be exciting and fulfilling no matter how challenging they seem. So grab your camera, head outside, and let the fun begin!
Post-Processing and Editing
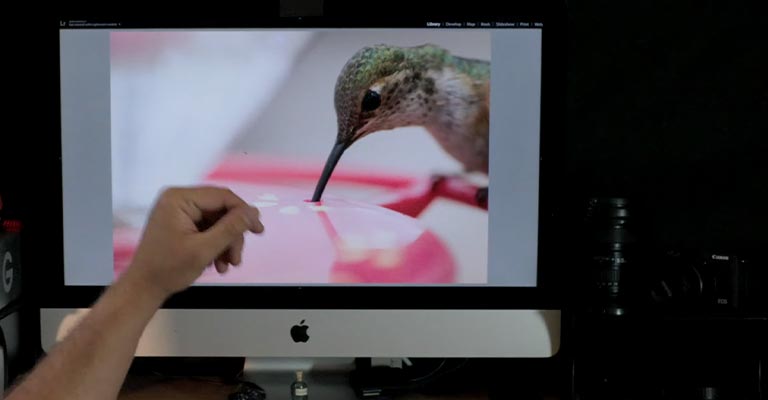
Once I’ve captured my hummingbird photos, it’s time for the magic of post-processing and editing. This stage is where a good photo transforms into a great one. Let me share some tips on making your hummingbird shots stand out.
To start with, crop and straighten your images as needed. Since hummingbirds are tiny creatures, you’ll likely need to zoom in during post-processing. Be careful not to overdo it, though – you don’t want to lose the beautiful details!
Next up is adjusting exposure and contrast. If your shot is too bright or dark, tweaking these settings can work wonders.
Remember that achieving the right balance between highlights and shadows is key when photographing hummingbirds because their iridescent feathers often reflect light in unique ways.
Color correction comes next on my list. Hummingbirds are known for their vibrant colors, so you want those hues to shine through in your images! Play around with saturation and vibrance until you’re happy with how the bird’s plumage looks.
Lastly, let’s talk about noise reduction and sharpening. High-speed photography can often produce grainy images, especially if you’re shooting in low-light conditions.
Use noise reduction tools sparingly – they might make your image look smoother but could also reduce detail if overused.
Sharpening, on the other hand, can help bring out those tiny details that make hummingbird photos so captivating: the texture of the feathers and the glint in their eyes. But again – moderation is key here!
Here’s a quick recap:
-
Crop & Straighten
-
Adjust Exposure & Contrast
-
Color Correction
-
Noise Reduction
-
Sharpen
Post-processing isn’t just about fixing mistakes – it’s an art form all its own! Practice makes perfect, so don’t be afraid to experiment with different techniques until you find what works best for you and your hummingbird photos.
Conclusion
I’ve journeyed with you, exploring the dynamic world of hummingbird photography. It’s been an enlightening ride.
We’ve delved into strategies to attract these tiny wonders, discussed the importance of patience and timing, and even touched on technical aspects like camera settings and equipment.
What a thrilling journey it’s been!
Let’s take a moment to recap the main points:
-
Investing in a good quality camera and zoom lenses is crucial.
-
Patience is your best friend – wait for that perfect shot.
-
Use natural light as much as possible, but don’t be afraid to experiment with flash.
-
Timing matters – early or late afternoon often provides the best lighting conditions.
-
Attracting hummingbirds can be simplified by using red feeders filled with sugar water.
Bear in mind it’s not all about having top-notch gear. It’s also about understanding these speedy creatures’ behavior and adapting your approach accordingly.
In my experience, I’ve found nothing more rewarding than capturing breathtaking shots of these vibrant birds mid-flight after hours of patient observation.
It’s not just about taking pretty pictures; it’s also about appreciating nature in its purest form.
So grab your camera, head out there, and start clicking! Remember, practice makes perfect. The more you shoot, the better you anticipate their movements for that dream shot.
By incorporating these tips into your photography routine, I’m confident you’ll be snapping stunning photos of hummingbirds before you know it! Happy shooting!